3 Pro Tips to Make Your HubSpot Workflows Successful
Katelyn Ahern Digital Project Manager#Digital Marketing, #Inbound Marketing, #HubSpot

HubSpot's workflows are a powerful tool for connecting with your customers. We share 3 pro tips for getting the most out of your workflows.

There is always a time and a place for marketing automation in your digital strategy. When used correctly, this automation tool can be leveraged to deliver the right message to the right audience at the right time. However, we recommend using caution (and lots of testing) when implementing automation into your inbound marketing plans.
HubSpot’s workflows can be a very powerful tool that can provide more value and personalization for your contacts and help move them through the Buyer’s Journey. We have talked about different types of workflows and things to consider when creating a workflow in the past, and today, we’ll cover several specific tips and tricks for creating workflows specifically in HubSpot marketing hub.
There are a number of important features that you should be familiar with when embarking on a workflow project in HubSpot. There are also frequent additions to this tool, so make sure to check with HubSpot about new features before you begin, as things may have changed.
Pro Tip #1: Don’t Forget About the Workflow Settings Tab
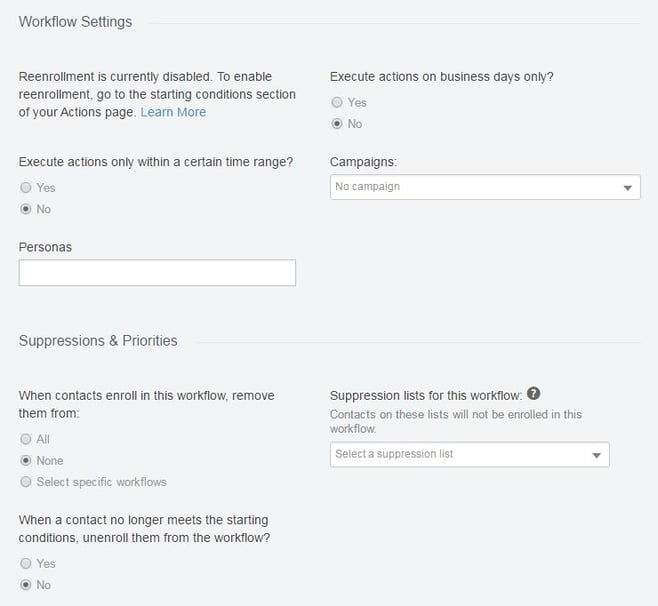
When you create workflows, all the actions and different parameters within the settings tab can often go overlooked. Ensure that you utilize these important features to keep your workflows organized and cater to your contacts’ needs.

In this tab, you can allow reenrollment for your contacts. This will be important for reoccurring circumstances where the action following it should be repeated each time.
For example: When sending a follow-up email with quote request details, you will want to allow reenrollment each time, ensuring that the contact gets a quote request with every form submission and for each variation they are requesting a quote for.
The settings tab also controls your execution time settings. These settings will allow you to put parameters around when your contacts receive automated emails or when your team members receive notification emails from the workflows. This allows you to restrict marketing emails to certain times of the day or days of the week.
For example: When sending an email that encourages contacts to call and speak with a sales rep, you want to ensure that they are only receiving these emails during your company’s business hours. The same example may apply when you are sending internal notifications and do not want to disrupt your team members outside of office hours.
The settings tab also allows you to keep your workflows organized by attaching them to a persona or campaign in your HubSpot portal. This filters the analytics of your workflow into your campaigns tool and keeps everything clean and aligned within your portal.
One additional set of settings on this page are your suppression and priorities settings, which allow you to manage your contacts’ enrollment in multiple workflows as they make the customer journey. Make sure to keep these in mind when you are running several workflows to make sure you aren’t sending multiple simultaneous workflow messages to the same contact.
Pro Tip #2: Test Your Workflows
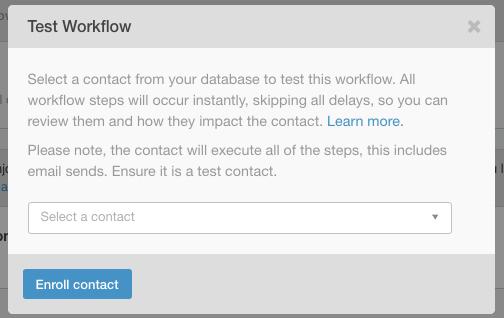
HubSpot has included a great test feature that will allow you to try out your automated workflows and see tests of your emails all at once before activating the workflow. With this feature, you can even see the test emails for a specific contact in your database to ensure that the intelligent parameters of your workflow are functioning properly. Don’t forget to utilize this step before launching a new workflow.

Pro Tip #3: Manage Data Quality Using Contact Records
While you are using your workflows for lead nurturing purposes to delight your contacts, you can also set contact properties to certain criteria to keep your team members informed about which contacts are completing certain actions within your workflows.

For example: If a contact registers for a webinar, you can set a custom contact property called "Webinar Registration" to "Registered," allowing your team members to see which contacts have completed this workflow action.
While this pro tip is not as clear cut as the others and will require a discussion with your marketing and sales teams to agree on enrollment triggers and changes, building in these efficiencies along with internal notification emails based on contacts’ actions can not only help you optimize but also help keep your team on the same page and maintain data quality within your HubSpot CRM.
There are a wide variety of goals and scenarios for using HubSpot workflows to provide more value to your contacts and create internal efficiencies on your team. Following these pro tips is a great way to ensure that you are getting the most out of your lead nurturing workflows. If you have any specific questions on how to best use workflows for your circumstances, feel free to reach out and contact us or connect with us in the comments below.
Image credit: created using Vector Designed by Freepik
Related Posts

Making ChatGPT Sound More Human – Guidance for Writers
ChatGPT is an innovative platform for enhancing your writing, but here are a few ways to help from losing your “voice” while using it...

Why Do I Need an SSL Certificate?
Without understanding what an SSL Certificate is, it may be hard to realize why this is so important for your website. In this blog Diagram will cover both of these topics.
Results Matter.
We design creative digital solutions that grow your business, strengthen your brand and engage your audience. Our team blends creativity with insights, analytics and technology to deliver beauty, function, accessibility and most of all, ROI. Do you have a project you want to discuss?
Like what you read?
Subscribe to our blog "Diagram Views" for the latest trends in web design, inbound marketing and mobile strategy.
